Monday 29 July 2013

piCture pOlish Blog Fest 2013 - celebrating the year of the blogger

Pin It
I'm so excited to taking part in Blog Fest for the second time!

This year we were asked to come up with one nail art manicure using three PP shades.

The girls sent me three polishes: Ariel's Tale, Twinkle and Aphrodisiac


Ariel's Tale is a glitter top coat with ultra-fine and small turquoise/teal hex glitter. It applies like a dream and isn't too packed with glitter so you can play around with coverage.

Twinkle is an absolutely creamy gorgeous lilac shimmer. The second photo below really shows off the sparkle in the bottle. It is a tad streaky due to the pastel formula so I applied three thin coats for full coverage. You can get there in two thicker ones though.

Aphrodisiac is a classic deep purple (sort of a cool toned aubergine) shimmer. This bad boy is a one coater - can't beat that, can you?! The formula is very flowing and concentrated.

My favourite is Twinkle but they are all really solid staples everyone nail polish freak should have in their collection!!!


Here is the nail art look I came up with:


Tutorial

Index
1. Starting with a base of Twinkle create a sponge gradient using Aphrodisiac and Twinkle.
2. Apply one coat of Ariel's Tale.

Middle
1. Paint on a base of Twinkle.
2. Make the heart stencil by folding a piece of sticky tape in half; along the folded edge cut out one half of a heart, ensuring it is the correct size for your nail.
3. Unfold the tape which should now look like a cut out heart and stick firmly to the centre of your nail.
4. Using nail polish remover or acetone with a cotton bud, remove the polish from the cut-out area.
5. Remove the tape and neaten up the heart using a cleanup brush if necessary.
6. To create the glitter border put a glob of Ariel's Tale on to some scrap paper and use a toothpick to pick up 1 small hex at a time, placing them around the edge of the heart.

Ring
1. Start with a base of Aphrodisiac
2. Using a fine dotting tool, create some four petaled flowers in Twinkle.
3. Place a rhinestone in the middle of each flower.

Pinkie
1. Start with a base of Aphrodisiac.
2. Create a glitter gradient by sponging Ariel's Tale from base to tip.

Apply one - two coats of a glossy top coat to each nail and your manicure is complete!


This year you get to vote for your favourite Blog Fest manicure. All designs will be posted to the PP Pinterest page and the one with the most 'likes' will be invited to create a collaboration shade!
Be sure to like your favourites!
Additionally, all of the Blog Fest participants will vote for their favourite and the PP team will also choose one blogger to create a collaboration shade too!

piCture pOlish is available direct from their On-line Store, as well as through their network partners. Here are links to their ShippingNetwork and Everyday Deals pages.

The girls are really active on social media posting swatches and reviews and they often hold contests and giveaways on the following pages:
Facebook    Twitter    Pinterest   Instagram You Tube


I hope you like my design, it has been so fun to wear - lots of compliments!


xxx
NPA

Friday 26 July 2013

Lac Attack Beauxbatons Academy & a stamping fail

Pin It
I took full advantage of the Harlow & Co Canada Day Sale earlier this month and bought all the red lime crime lip products!!! I also snagged one Lac Attack at the same time (was running out of funds!), Beauxbatons Academy.
There are a couple of other Harry Potter Magical Musings lacquers I want but they are always out of stock :(. I settled for just the one but hopefully I can get my hands on The Horcrux Of It... and Death Day Party too.


Lac Attack Beauxbatons Academy


 Beauxbatons Academy is a white creme with blue, yellow and white matte glitter, inspired by the uniforms worn by the all female students from the french wizardry school in Harry Potter and The Goblet of Fire. The formula is moderately thick but applies nicely in two coats and only required one layer of Seche Vite for a glossy finish.

I decided to try out a new stamping plate and polish I bought off Born Pretty Store too but had a pretty disappointing result.


It was one of their knock off Konad image plates and the designs weren't cut properly so I got a range of smudged/unidentifiable images... The stamping polish was decent though. I'll try again with a different stamper and polish but I think the $1 plate was probably too good to be true, tear.

Oh well, my nails still looked pretty from a distance haha!

Are you a Harry Potter geek too?


xxx
NPA

Monday 22 July 2013

Giveaway Winners & The Battle #10 - Matte vs Holo

Pin It
Thank you to everyone who entered my 'Because I Passed My Exams' Giveaway.
Congratulations to Sarah Lundy & Jewell Sparkled who won the Harlow & Co $20 voucher and the NZ Polish Prize Pack, respectively.
Please contact me ladies, I would hate to draw new winners!!!


Yes, The Battle is back. One of these days I'll manage more than 1 challenge a month, I promise!!!!
Today it's holo vs matte... come on there is NO comparison. Holo all the way, baby!


ILNP Grape Alicious


ILNP Grape Alicious with Essie Matte About You


Half 'n half


Even though Grape Alicious looks nice matte, the holo absolutely dies. I can't tell you how happy I was when Orly Glosser magically restored the rainbows!

Now I need to do a Duochrome vs Foil look because I skipped Challenge 9, woops.

Hope your weekends were absolutely amazing in some little way :)


xxx
NPA

Friday 19 July 2013

NPA Loves Candy Lacquer #2

Pin It
TGIF!

I'm back with Part II of my Candy Lacquer swatches. Yesterday I showed you Candy Girl, Barbie Girl and Princess Celestia. Today I have Razzle Dazzle, Snow Bunny & Summer Circus for you:


Candy Lacquer Razzle Dazzle over OPI Lucky Lucky Lavender


Razzle Dazzle is a serious mix of satin/matte glitters. Pastel purple, blue and green; neon pink & blue, coral red and lime... Surprisingly it works pretty well with the large hexes, squares, stars, hearts, diamonds, butterflies and flowers. I paired 1+ coats with a lilac toned pastel pink creme and used 1 layer of Glitter Gloss to smooth it.


Candy Lacquer Snow Bunny  over Orly Pretty Ugly


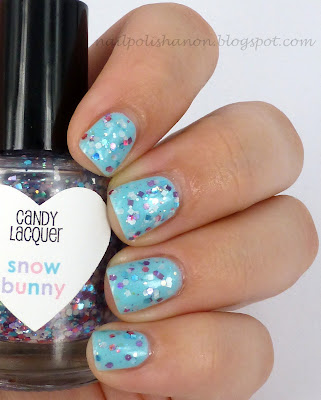
 Snow Bunny has been around for months and I can't tell you how often I've added it to my cart! Now it is finally mine and does not disappoint in the slightest!!!!! It's the perfect mix of small square and hex glitter in white satin and blue and purple holo; as well as fine iridescent glitters. The sparkle is awesome and it's nice to see Candy Lacquer can make great regular glitter top coats too. I layered 1 coat over Pretty Ugly with 1 coat of Seche Vite.


Candy Lacquer Summer Circus over China Glaze Peachy Keen


Summer Circus is a really festive mix of bright pastel hexes in baby pink, medium pink, yellow, lemon, lilac, orange and green. It's bloody packed with glitter so one coat was plenty and I didn't need to do any glitter placement! The pieces of glitter are thick so I needed two layers of Glitter Gloss plus some Seche Vite for a glassy finish. In the photos above I only had on 1 coat of GG. It looks like a sherbet mani!!!

Candy Lacquer is available online for $8.50/15mL bottle.

Do not forget to enter my Giveaway for the chance to win a $20 Harlow & Co voucher. Ends in 21 hours!!!!

xxx
NPA

Thursday 18 July 2013

Nautical Nails

Pin It
Press Sample

Ahoy!

I had big outdoor swatching plans today but the sky decided to be grumpy and put away the sun! Stinky winter right?
So tonight I've got some nautical themed nail art to share.


OPI Alpine Snow, China Glaze First Mate & Millennium with decals


I love nautical inspired fashion so this was a really fun mani for me. I couldn't find my striping tape so I just cut strips of regular sellotape and tried (and failed!) to make an even pattern!
I did the regular blue and white stripes on every nail except my accent which I painted silver and blue instead. I thought it'd standout but it's pretty subtle actually. In most of the photos you can't even tell. Next time I'll introduce some red, yeah?

I used water decals from Born Pretty Store to complete the look.

Compass Anchor Pattern
The pack came with four decals each, of two different compass and anchor designs. The decals aren't tiny so I had to angle them to actually fit on my nails. My pinkie finger was too narrow for any of them to fit. No skin off my nose though, because I think these look better as an accent.

These were very easy to work with. You just cut them out, remove the plastic covering and lay face down in water until the backing card is fully soaked. Then to apply, just slide the decal off the wet card and push on to your nail and leave to dry. If you want to re-position the decal all you have to do is wet it again and it'll slide around for you. Once it's perfect seal it with 1 layer of top coat. I used Seche Vite above.

If you want to get some nail art supplies of your own you can use my 10% off voucher at BPS. They offer worldwide free shipping!!!!


So... what do you think?


xxx
NPA

Tuesday 16 July 2013

NPA Loves Candy Lacquer #1

Pin It
If you're a regular reader, you might have figured out that I'm a lover of Candy Lacquer glitters. Sandra makes so many different novelty glitter mixes. My favourites involve hearts and butterflies but there are stars, moons, flowers etc.

When my latest parcel arrived, I literally tore it open and started swatching!


Candy Lacquer Barbie Girl over China Glaze Grape Pop


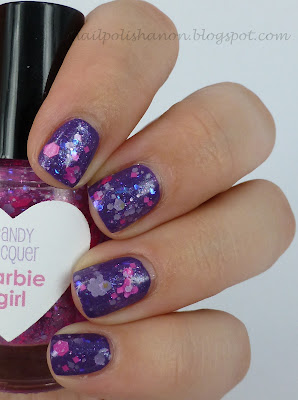
 Barbie Girl is a seriously exciting glitter topper. Instead of the standard glitter in a clear base, Sandra loaded it up with pink-purple color shifting shimmer too. Then there are neon pink squares, butterflies and large hexes; pastel purple flowers, small and medium hexes and blue iridescent flakes. It packs a mighty punch to say the least! I applied one coat - with a bit of individual placement - over my grape creme base and finished it with two coats of Glitter Gloss for a smooth and shiny mani.


Candy Lacquer Candy Girl over Nicole by OPI Kim-pletely in Love


Candy Girl is a sweet, pastel glitter mix containing pink, green, purple and blue hexes with flowers, large squares, giant hexes and heart glitter. I actually put off placing an order for about a month because CG was sold out for a while and I couldn't live without it!!! I layered 1 coat over a very pale baby pink shimmer and placed a few pieces of glitter in the gaps too. This one is finished with 1 coat of Glitter Gloss and Seche Vite.


Candy Lacquer Princess Celestia over Cult Nails Mind Control


I have been drooling over Princess Celestia for MONTHS! Whenever I made an order it was either sold out, or I just couldn't afford any more bottles. Thankfully it's a permanent offering, so I snagged it this time. It's a white and iridescent glitter mix with gold holo stars, white hearts, diamonds, squares and hexes. Too much love!!!!!!! Here I've layered 1+ coats over Mind Control and smoothed it with Glitter Gloss and Seche Vite.

The one thing I wish I could change? I wish chunky glitters could dry smoother, but i doubt that's ever going to happen. Wider nails would help too! Glitter manufacturers PRETTY PLEASE make thinner, solvent resistant glitter?

You can get your own Candies from the big cartel store for US$8.50/15mL bottle and they offer international shipping.

Don't forget to enter my giveaway, it closes in 3 days!!!


xxx
NPA
Saturday 13 July 2013

piCture pOlish: Denim, Focus, Hope, Monroe, Peacock & Shocked

Pin It
I think we all know by now that Picture Polish make some of the best lacquers around. I've been a huge fan since I discovered the company several years ago, but I had only bought 3 shades from them before they started sending me lacquers for review last year. I just never had any enough money at the right time, you know? So many polishes, such a small wallet...

But after receiving so many collaboration and newer shades to review a couple of months ago, I had to have the rest!!!!! I made the plunge and bought 9 lemmings and now I'm almost caught up on all my PP must haves; damn you new collaboration shades. I'm looking at you Sea Jewel & you Whimsy!

Today I have 6 of the 9 to share with you, enjoy.


piCture pOlish Denim


 Denim is a near periwinkle blue shimmer with glowy blue micro-glitter and white flaky glitter/shimmer. Denim has been on my most wanted list since I first discovered PP more than two years ago. How did it take me so god damned long to snag her????? The formula is excellent, you only need two thin coats.


piCture pOlish Focus


 Focus is a collaboration shade from Sheila of Pointless Cafe. It's an amazing dark pink-wine/red purple hue with flaky shimmer and glowing pink/red micro-shimmer flecks too. My camera couldn't handle the beauty so these photos do no justice to Sheila's baby! Another great, two coat formula.


piCture pOlish Hope


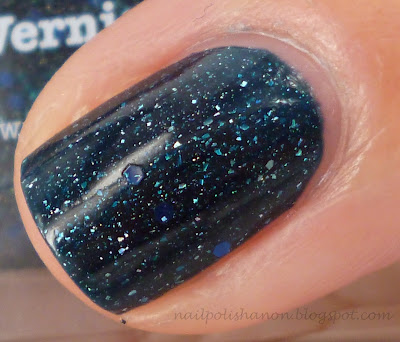
 Hope is a dark teal blue jelly with scattered holographic shards and blue hex glitter. It's another collaboration shade, this time created by the woman behind the french blog Vernis en Folie. It's got the same great formula as the other holo shard polishes PP does so well, but the smattering of glitter takes you by surprise! I'd probably prefer it without the glitter, but the blue is a nice accent. Another perfect two coater.


piCture pOlish Monroe


 Monroe v2.0 is a burgundy scattered holo shard lacquer. I now own both versions of this beauty!!! The formula is perfection, especially compared to the troubling original and the hue, divine!!! Say it with me now, "Two coats of perfection".


piCture pOlish Peacock


 Peacock was released with the original Opulence range and is the only remaining 1 out of the 3 not to be discontinued! It has a dark, dull purple (that appears kind of gray at 1-2 coats) base and tons of fine emerald green hexes plus tiny silver bar glitter. On its own you need 3 coats for full coverage and it's a pretty thick formulation so I recommend thin coats. The dullness of the purple base lets Peacock down, so I'll try layering it over a brighter purple creme next time.


piCture pOlish Shocked


Shocked is yet another collaboration polish. Shatter Me Claire filled a huge pink holo hole in the PP line with this bright medium pink scattered holo shard lacquer. Shocked is so girly and fun, but the jelly consistency keeps it from looking childish or tacky - great job SMC and PP! It is sheerer than the rest of the polishes, needing at least 3 coats for full coverage. Ladies with long nails may need 4 to cover their smile lines.


I'm so freaking pleased that I took the plunge and bought a bunch of PP lemmings. The cost wasn't too bad in the end either because I bought direct from PP using the Every Day Deals - buy 7, get 2 free. NZ Shipping is $19 for 1-9 bottles and I only had to pay for 7 so that's a saving of AUS$20 straight up!
They are shipped by DHL so you get them within 3 days wahooooooo!!!!! I love DHL :)

Which PPs are you lemming?

Don't forget to enter my 'Because I Passed My Exams' Giveaway.


xxx
NPA

LinkWithin

Related Posts Plugin for WordPress, Blogger...